There are several skills that we expect our students across our degrees to have mastered before starting their course, and some of these skills are related to the functions of Microsoft Word. As we don’t have time to integrate the teaching of these skills into our subjects (believe me, I wish we did!), I have decided to put together some guides to help students upskill.
The written instructions provided are based on the accompanying videos. Only students and staff of the School of Information and Communication Studies at Charles Sturt University will have access to the videos, but everyone is welcome to read through the written instructions!
So, without further ado… (Click the title to see the instructions)
Using Font Styles in Microsoft Word
Start with your title at the top of the document.
Navigate to the ‘Home’ menu ribbon, where you’ll find different options for Font Styles.

Ensure that your text cursor (the blinking I) is in the title sentence and then click on the ‘Title’ style to apply it.
You’ll then want to differentiate between various levels of headings throughout your document. For example, your ‘Introduction’ would be a main heading, so use ‘Heading 1’ for that.
When you’re ready for the main content, or body paragraphs, give these sections another ‘Heading 1’.
If you want to talk about subtopics within these main sections, use ‘Heading 2’. This gives your document structure and makes it easier to navigate.
You might even like to add another layer of sub-headings. If so, choose ‘Heading 3’ (and so on and so forth if you want even more levels – but don’t go overboard!)
Continue this pattern for the rest of your document, using ‘Heading 1’ for main topics and ‘Heading 2’ for subtopics, and so on.
Your conclusion would also be ‘Heading 1’, indicating the end of your essay.
Bonus: To see more options or to edit the existing styles, click on the arrow at the right end of the Styles section.
Remember, using heading styles can greatly help in organising your essays and academic tasks, making them easier to navigate and understand.
Page v Section Breaks in Microsoft Word
Page breaks
First, start with a document filled with text, headings, and subheadings.
Place your cursor where you want to start a new page, this is particularly relevant for References lists in APA7 style, which requires the list to start on a new page.
Ensure your references have a heading ‘References’ (which should be centred) and identify them as ‘Heading 1’.
There are two ways to move your references to start on a new page.
Option 1: Using menu items in Word
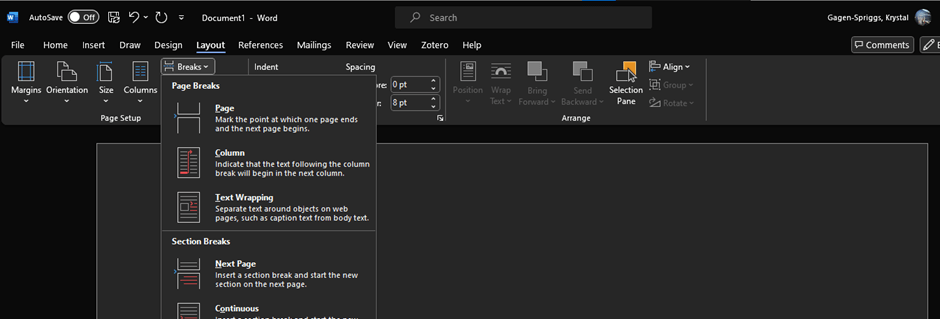
- Go to the ‘Layout’ tab;
- Select ‘Breaks’; and then,
- Choose ‘Page Break’.
Option 2: Keyboard shortcuts
- For Windows = hold Control and press Enter
- For Mac = hold Command and press Enter
Using Page Breaks ensures that no matter what changes you make to the previous page, your references will always start on a new page.
Section breaks
A ‘Section Break’ is similar to a page break but allows you to change the format of specific pages without changing the whole document, such as the layout of pages.
Section Breaks are found in the same place as Page Breaks:
- Go to the ‘Layout’ tab;
- Select ‘Breaks’; and then,
- Choose ‘Section Break’.
Once you’ve inserted a section break, you can change the orientation of your pages. For example, you can set a page to ‘Landscape’ mode, and it will only affect this page and any following it, but won’t change any pages before it.
Add another section break and you can change the orientation of the next page back to ‘Portrait’.
This method helps you differentiate between page breaks and section breaks. It also ensures your references always start on a new page without the need to repeatedly press ‘Enter’.
Page Numbers in Microsoft Word
Navigate to the ‘Insert’ tab in the Word Document menu.
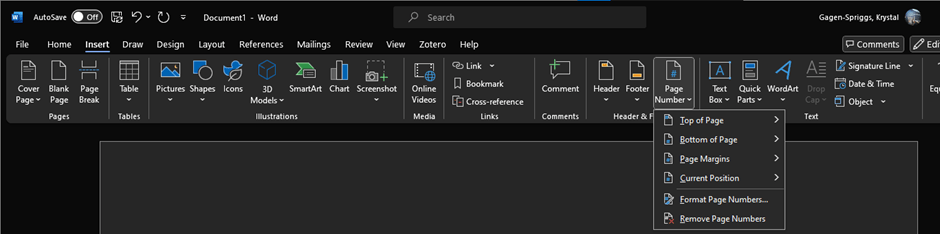
Click on the ‘Page Number’ button to open the drop-down menu.
Choose your preferred location for the page numbers. I would suggest the bottom of the page as it’s more common. You can also choose left, middle, or right alignment for the page numbers.
Click on your chosen option to add the page numbers.
If you want the first page of your document to have different numbering or no numbering at all:
- Enable the ‘Different First Page’ option; then,
- Delete the page number from the first page.
Note: The remaining pages will continue to have their respective page numbers.
Remember, it’s important to include page numbers on your assessment items as per the School of Information and Communication Studies presentation guidelines.
Table of Contents in Microsoft Word
Start with a new, empty page to place your Table of Contents on. This only works if you have used Font Styles throughout your paper.
Go to the References tab in the Word Document Menu and click on Table of Contents. This will bring up the drop-down menu with choices of table styles.
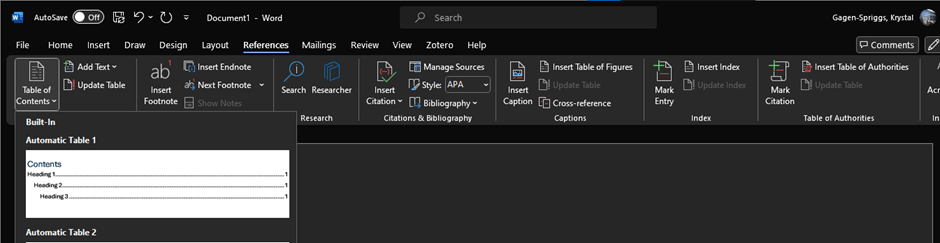
Select a style of Table of Contents. I recommend the first option as it is clean and simple.
The table of contents will be generated automatically, drawing on the Font Styles you have assigned throughout your paper.
It is important to ensure that you update your Table of Contents as your last step before submission.
Updating the Table of Contents:
- Click on the title of your Table of Contents;
- Click on the ‘Update Table’; and,
- when prompted, choose Update Entire Table (this updates titles AND page numbers, which is key).
Your table of contents is now updated and ready for submission.
Navigating Documents in Microsoft Word

Navigation Pane:
Use this feature to move through lengthy documents, or easily see the flow of headings and sub-headings, throughout your document. You can so jump to specific sections via this menu.
Go to the ‘View’ tab in the Word Document menu and check the box next to ‘Navigation Pane’.
This opens a side panel with all the headings in your document, allowing for easy navigation.
Note: If you’ve been using the ‘Find’ function (control F or command F), the Navigation Pane may open to those results. To view headings, simply click on ‘Headings’ tab in the pane.
Opening the same document in multiple windows:
This feature allows you to view and edit the document in both windows simultaneously. Changes in one window are reflected in both, as is saving. Very handy for long documents or checking references!
To access this, choose ‘New Window’ in the ‘View’ tab of the Word Document menu. You can then arrange your windows as you like by moving them around your screen/s.
Using the ‘Split’ view:
Another great feature available, especially if you do not have big screens, is the ability to split one window in two.
To do this, go to the ‘View’ tab of the Word Document menu and click ‘Split’ to divide the screen into two sections. You can then scroll up, down and side-to-side in each half to see different parts of your document, each showing a different part of your document.
To remove the split, return to ‘View’ and click ‘Remove Split’.
Referencing in Microsoft Word
Microsoft Word does offer basic citation insertion. The functionality is a bit limited, but it is a great place to start for those new to reference management.
The reference management in Word allows you to insert in-text citations and add a corresponding reference list. It is recommended that you create the records as you write to save time when finalising your task.
Adding a citation
First, decide where you want to include an in-text citation and make sure your text cursor (I) is in the right place.
Go to the ‘References’ tab in the Word Document menu and click to open the drop-down menu.

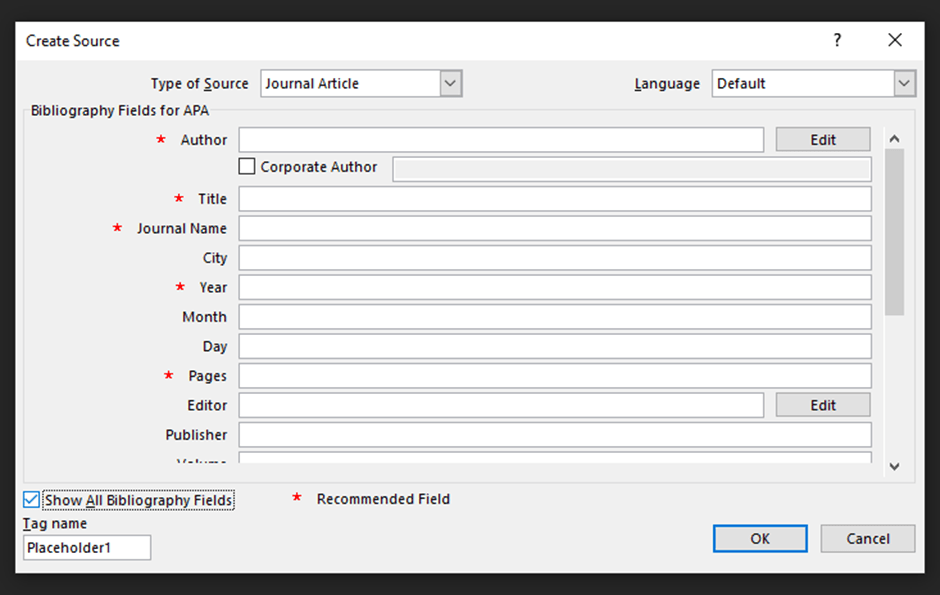
Select ‘Add New Source’ and then choose the style you want your referencing to be in. For CSU, we use APA7.
Note: To see what style your references are in, check the ‘Style’ drop-down in the ‘Citations & Bibliography’ section of the ‘References’ menu.
Fill in the information required. Please note that you will need to select ‘Show all bibliography fields’ to ensure you include all elements required by APA7.
Note: Please do not be fooled by the *Required fields – there are more elements required to meet APA7 requirements than the window suggests!
Click ‘Ok’ once finished and it will insert the citation where your text cursor (I) is.
Once a citation is saved, you can insert it again into the document by clicking on ‘Insert Citation’ and clicking on the one you want to insert.
Note: You can select multiple if you are referring to multiple, corroborating sources of evidence!
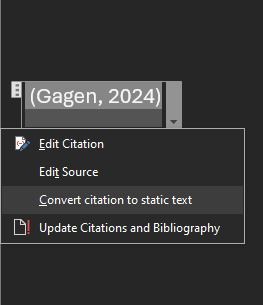
Editing a citation
Once a citation is inserted into a paragraph, you can edit it. To do this, click on the drop-down arrow and choose ‘Edit Citation.’
This will allow you to add page numbers (if you’re citing a direct quote) or suppress the author/year/title, depending on how you have used the citation in your paragraph, such as using the author’s name outside the parentheses ().
Editing a source
Click the drop-down arrow on an in-text citation of the item you want to edit and choose ‘Edit Source.’ This will open the reference window – please make sure that you select ‘Show all bibliography fields.’ Edit as needed!
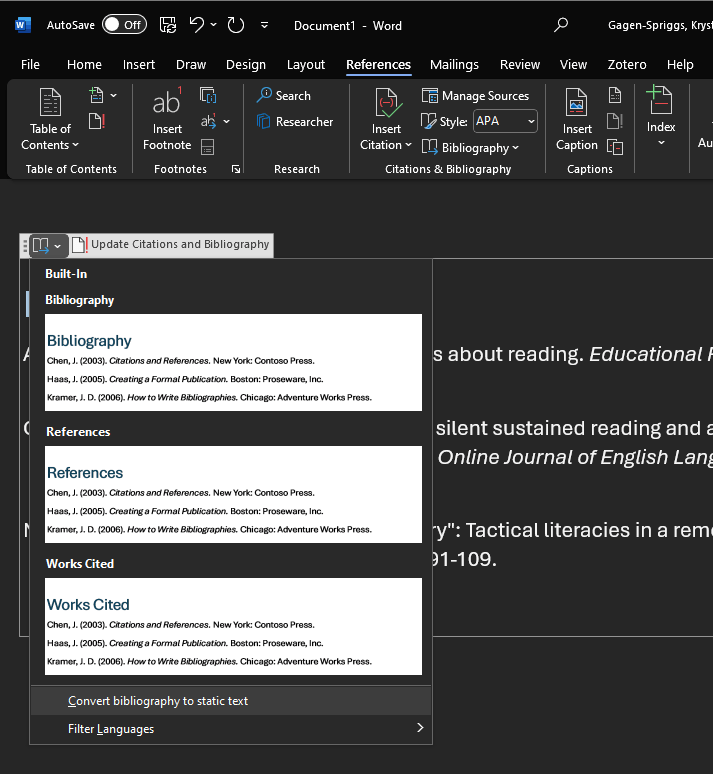
Inserting the reference list
To insert your reference list, go to ‘Bibliography’ under the ‘References’ tab in the Word Document menu and select ‘References’ (because we use APA7!)
Word will automatically insert your references in alphabetical order, bringing in all items you created ‘citations’ for.
Make sure that you update your Reference list before submission! It’s the same process as updating your Table of Contents.
Note: Please ensure you should double-check the formatting of the reference list before submission to ensure accuracy.
Finalising the references
It’s recommended to convert your reference list and in-text citations to static text. This allows each reference list item to be commented on individually and protect the document from formatting issues when being uploaded or downloaded.
To turn the reference list to static text, click the title of the list, ‘References,’ and then click the ‘open book’ icon. From here, click the ‘Convert bibliography to static text’ option.
The conversion of in-text citations to static text needs to happen on a one-by-one basis, but follows the same principle: Click on the drop-down arrow, select ‘Convert citation to static text.’
This should be the final step before submission!
